Photobucket Photobucket Photobucket Photobucket Photobucket
PhotobucketPhotobucketPhotobucketPhotobucketPhotobucketPhotobucketPhotobucketPhotobucket

Monday, October 31, 2011

Halloween News

Happy Halloween Everyone!!

As I'm sure you have been able to tell, I am not much of one for Halloween. I always make sure my kids get to dress up and trunk or treat (of course) but as far as making costumes, decorating, and doing Halloween games and such.....you will not find that here. :)

So, since everyone will be talking about all of their Halloween goodness, I have decided to let this blog be for the day, and get their costumes ready. We will be pulling something out of our treasure box of costumes that are in their rooms. Why buy or make some when we have three trunks FULL and overflowing?? ;) I guess that may be the couponer in me. HA!

Anywho, I do have something SUPER FUN for tomorrow!! I will be blog swapping with {GINGER SNAP CRAFTS} !! Ahhhhhh! I still can't believe it! And, just to give you a little hint...Remember me talking about pallets a few weeks months ago??  Well, you may be seeing some of that tomorrow, if you go to visit. YAY!!

Last, but certainly not least.....did you see my followers number?? :D  YAY!!  Not only have I made it to 100, But I have been gaining a new fabulous follower almost every day since!  How Exciting!!  When I reached 100 I turned to my facebook page.  What?  You didn't know I was social?  Well, I try to be.  You can find my link over on the right top of my page, if you would like to follow along. :)  Anyway, back to the story.  I asked over on my facebook page what kind of giveaway THEY would like to see for my 100 followers.  Unfortunately.....only one person replied.  OOPS.  So, do you have anything you would like to win??  This is, after all, a giveaway for YOU my readers. :D  So, just leave me a comment, or shoot me an email if you have any ideas!  I would love to hear.
I believe that is all!

Have a fabulous Halloween with all of your dressed up cuties.

Friday, October 28, 2011

Fair Money Holder

I couldn't do a "craft fair" without a cute way to keep my money now could I? ;) So I decided to pull out some bandannas. Don't you love bandanna's? Or is this just me? I think they make super cute skirts for little girls (I will show you one I made for Riley, soon), head wraps, and even money holders! Lookie at my money holder....


I did not take pictures of how it was made, but I will explain how I did it.  It was super easy.  Decide which bandanna you want for your base (orange) and which one you want for your pockets (zebra).  I folded the zebra in half, and then cut that half into half.  I used the half that had the folded end, so that I could use that part as the "top" of my pockets. I then folded my base (orange) into half.  I put my zebra sandwiched between my orange (with the folded part of the zebra towards the middle)  I then sewed all the way around, leaving a small hole to flip it inside out.  Once finished sewing, flip it inside out, this will give you the pockets on the outside.  I then sewed the remaining hole in the orange one up.  I then sewed a straight line down the middle of the zebra, to create the "pockets".

Once this is done, all you have to do is sew a ribbon around the top (big enough to rap around you with room to tie in the back).

So, what do you think?  Did you understand my language on how I did it?  If not, please let me know and I will make another one, and take pictures this time. ;)  I did this the morning of the sale, so I was in a super hurry! Oops.

I think it is very cute, and I felt so "festive" with the orange and black, since it was  a "fall festival". Ha!

I like to party over here.

Thanks for stopping by!

Have a great day!


Wednesday, October 26, 2011

Pinterest Make Me: Sign

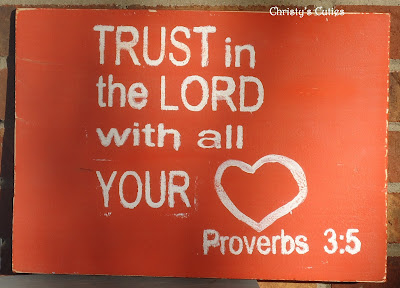
I have found a love for signs. The past few months I have been having my mom make them for me with her Cricut. But after doing this project, I love the way a stencil makes the boards look.  Of course I turned to pinterest!  I think I may have seriously found my favorite bible verse by this.  I don't know what it is about this time in my life, but I am in LOVE with this verse.  Here is the one I had "pinned". 

Source: None via Christy on Pinterest

Here is mine.

I used a stencil cut from my moms cricut.  Painted the board orange, with white lettering.  After it was dried, I sanded the top of it.  With the sanding, it maked the wording look like it is rusted.  It looks like it has been made for years.  I love it!  Now I just have to find the perfect place for it.

So, what about you?  Are you acctually making things you find on pinterest?

I like to party here!

Thanks so much for reading!  Have a great day!!

Tuesday, October 25, 2011

Hoo Am I?

Yep, it's Tuesday! That means it's time for another Hoo are you?

Here are the questions for this week, and my answers.

1. Do you like the season, Fall?
Yes, I love fall. I love the crisp chilly air. I love the colors of the changing trees. I love being able to pull out the hot chocolate. I love it!!

2. What is your favorite fall smell?
I think pumpkin pie, or apple cider. I don't eat/drink either, but I love the smell of them. Crazy, huh?

3, What is your favorite activity to do in the fall?
Pumpkin patch with my family every year. I love it!

4. Do you dress in fall colors during the season?
Yes, I turn to browns, golds, and greens. Never really noticed, till now. Ha!

5. Name 4 qualities about yourself that start with each letter in the word FALL!
Oh Gesh! Here we go....
F - Funny
A - Annoying (hubby would say so at times. lol)
L - Loving
L - Lingering ( You will NEVER forget me! ;))

Ok, so maybe I'm not so good at the letter words. HA!

I will be linking up to Night Owl Crafting.

NightOwlCrafting
Thanks for stopping in!

Have a great day!

Monday, October 24, 2011

First Craft Fair

I just know all of you have been setting on the edge of your seats to hear from me about my First. Craft. Fair.  OK, well, in all honestly it was a school's fall festival....who allowed booths of all kinds to set up for a fee.  So not "really" a craft fair....but the first thing I have done with stuff that I have made.  So, I'll call it a craft fair. ;)

Anyway, wanna see some pictures?  I know you do!  If not, sorry I gotta show 'em anyway.  Ha! 

Here is the full table.  :)  I still have a lot to learn....like making sure I know the size of the table so that my cloth FITS IT!  Oops.  I attached the pennant banners to the front to spruce it up a little.  I had a lot of things, but I will highlight a few and go over some others through the week, along with a few tutorials.

One side.  I used an old suitcase.  I LOVE that suitcase.  I wonder if I can talk my mom to let me keep it??  ;0) {Hint, Hint, mom}  This is holding wooden signs, ruffle scarf, t-shirt scarves, and camera strap covers.

These are some elastic lace bracelets.  They seem to be my big seller.  I sold two of them!  LOL  More on that later.

Remember the giveaway I won from Johnny In A Dress?  This is the shelf. :)  I still love it so!  I had scarves, hair bands, and flower clips on it.

I have a lot to learn with craft fairs.  For my first one, I felt good about it.  I think the table was cute, I like what I decided to share.  I paid $15 for my "fee" and made $15.  So, at least I broke even right?  Ha!  I only paid out $5 for some fabric to make the blue scarves, and everything else was made from my stash.  Not too shabby, I think.  I am not discouraged by this sale, I will be doing more.  I will just add to what I have, and branch out in what I make.  I think I may have had to many "accessories" and not enough options for all people to want.  I will add in some childrens clothing to the next one.

So what do you think?  Did  you like the table set up?  Do you think I have too much of one thing, or need to add someing inparticular?  Any info you have will help. :)  I would love to hear.

Thanks so much for reading everyone!  Have a great week!!

Friday, October 21, 2011

Minnie Mouse Love!

My mom is one creative lady. I know, I know, I say that all of the time! Sorry, but she is. :) Anyway, back to the reason for this post. She came up with this super cute idea for a ornament I could sell at my {first} fair...coming up...TOMORROW! AAAHhhh!!

Here is how it goes.....Get two sized of styrofoam balls.

Hot glue the smaller size balls onto the top lager one....Like how ears would look on Minnie. ;)  Then grab some black paint.

Paint all of the styrofoam.  You will get messy.....but that's half the fun of painting, right?  LOL

Next I found some long metal "straight hooks".  Not sure of the correct name for them, but they are used in jewelry making....does that help?  HA!  Anyway, put a little hot glue on the stick, and push it into the top.  Now you have a hook for your Christmas tree ornament hooks. Did ya follow that last sentence?  Gesh, am I killing this post or what?  Sorry!

Now, cut some ribbon and hot glue it onto the front.  Then put a cute lil jewel on the ribbon to dress it up a bit.  Here is what they will look like at the end. :)  They are so cute!

I hope you like them...and I hope some of the people at the fair tomorrow likes them, too.  HA!

Have a great night!

I like to party over here!

Wednesday, October 19, 2011

Pinterest: Make Me! {Bracelet}

This past week I have been so busy working on things for my FIRST craft fair!  It is this coming weekend...and I am SO nervous!  I have never made so many things.  In fact, I have never SOLD anything.  LOL  Up to this point I have only ever made things for friends and family.  Can you say Double Nervous?? 

Anyway, back to the post.  While looking on Pinterest {Of course} I seen this bracelet.  I tracked it back, but there was not a tutorial to make one.  Lucky for me, I was at my moms last week and she came up with how to do it.   :)

Here is the one I found....

Here is how to make one yourself.  Take 2 LONG strings of jute (or other string) fold them in half and tie a knot with enough space for your button to slid through in the end.

Now, you should have 4 strings.  Put how ever many beads on the stings as you would like.  I did three beads, on separate strings.  Now, tie another knot in the strings.  {You can choose how much space you want, and how many "knots".}

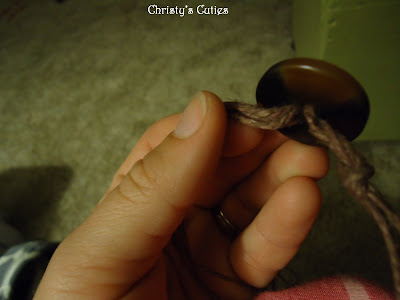
Once you finish with your beads and knots {I did three "separate" bead sections}, you can put your button on the end.  I used large buttons so that I could fit two strings in each hole on the top, then slide them back through to the bottom.

Now that you have your string through your button, you can tie close it off and cut the excess string.

This is what the top of my button looked like.

Here is the finished product!  I love it!

And of course I couldn't just stick with plain colors.  I needed some "cuties"!!

The two are my {favorite}!  Is it bad that I am kinda hoping they do not sell, so that I can keep them?? LOL

What do you think?  Like them?  Please let me know if you have any questions.

I like to party over here!

Have a fabulous day!
Sew Rockin'

Tuesday, October 18, 2011

Hooo Are You??

Well, well, well....It's time for a Hoo are you? :)
1. Do you sleep with the window open or the fan on no matter
what the weather is like?
Yes!  I have to have a fan on no matter what!  I love being cold, but cuddled with tons of warm blankets.

2. What is your favorite comfort food?
Chili for cold weather.....or a bag of chips if I am feeling sad/stressed.  Yes, I did say a BAG! 

3. Do you ever go to a chiropractor?
Nope.  I want to, though.  I have serious back paid a lot. :(
4.What is your most memorable Halloween costume growing up?
I was a black cat.  I don't know why I remember that, but I loved it.  It was a normal back shirt, black jeans, black flats, and I used eye liner to paint the "cat" face.  LOL  All stuff I already had.  :)
5.Do you prefer the sunrise or the sunset?
Sunset!  I hate being awake for the sunrise.  Ha!


Would you like to answer, too?  Head on over to Night Owl Crafting and link up!


NightOwlCrafting

Monday, October 17, 2011

Crafty Space

Hello lovelies!

I have been neglecting this here blog for a little over a week now.  I appoligize!  I have been soaking up time with my family in another state for the past week.  Is it always so crazy wen you get back home after a trip??  I have been trying to play catch up for a few days now, and still have an email box full of things to clear out.  Bear with me.  Please.  K? :)

Back to the reason for this here post.  I am always so jelouse of other's craft spaces and often times wonder what some bloggers spaces look like.  So, I thought I would show you mine.  Believe me....you will NOT be jealous.  LOL

So, this is what I have my crafty stuff in.....and just for the sake of "keepin it real" I have left all my "junk" in the picture above and below my cabinet.  Because I know how us bloggers wonder how some other blogger keep everything so "perfect" all of the time.  :)
 This is what it looked like before I decided to do a little "makeover".  Awefull!!
 These are the drawers on the left side.  I use them for beads, ribbon, and scrap fabric, and such.
 I decided I needed some "organization" so I made this basket my clothing "makeover/re-purpose" basket.
 This has all of my fabric folded nicely....for the most part.  Small stash, huh?  lol
 This is the after.  Top left is my HUGE giveaway score from this post!  The top right has projects that are supposed to be first and foremost when I get "crafty".....hasn't helped me complete things much, though.  lol  The the bottom are the baskets and extra large fabric pieces that I couldn't fit anywhere. 
 Ok, now that you know where I have been crafting...guess what??  I am MOVING into an acctual craft ROOM!  It is in the basement...blah.  But hopefully I can deal for my own space where I do not have to keep my sewing machine on a table tray in the living room corner.  HA! 

So, do you have a room, or a box like me for your crafty stuff?

Have a great week, friends!

Friday, October 14, 2011

JIAD WINNER!!

Hi lovelies!!

SO sorry I am just now getting a chance to post the winner of the Johnny In A Dress giveaway winner. My boys are on Fall break this week and we have been spending ALL of our time in another state with family. Grandma's and Grandpa's, Great Grandma's, cousins, Aunt and Uncles. YAY!!

I am VERY excited to announce that the winner of the giveaway is number 3, Julie!

YAY!!  So excited for you, hun!  I will be emailing Natalie and you soon. ;)

Thanks SO MUCH to all that have entered.  Have a great day!

I like to do projects with things I already have, or by re-purposing things.  For this I decided to re-use one of the many ice cream buckets that I have been saving.
I started by spray painting the bucket.  I used a flat black Krylon.

Here is the new beginning.  I did not spray the handle, I just took it off.

I started by dressing up the black with a bright orange pumpkin.  I just free handed the pumpkin and then continued adding layers of paint.

I decided that this would be used for my daughter, so every girl needs a little "bling" right?  I mean, candy AND bling?? Yes, please!  So I decided to use glitter and I made some bling circles all over. 

After the bucket, paint, and glitter had dried I added the handle, and tied some ribbon on either side.  Here is the final outcome.

I love the "bling" and the ribbons on either side!  It's much more fun than the normal plastic pumpkin bucket.  Don't ya think?


The last picture!  I can't wait to see how many times we will get to fill it up this year.  :)

I hope you all like my "Candy Bucket Cutie"!